Origami Box-Tutorial

Wanna make simple Origami boxes with lids? Here’s how you can-

Stuff you’ll need:
  • A pair of Scissors( the smaller the better)
  • Glue ( Fevicol or any other white glue is good)
  • Square Sheets of Paper( I use two different colours)
  • Patience

NOTE: Keep some extra paper to use for decorating the box lids and to make a flat lining for the boxes.

How to make the boxes:

NOTE: Instructions are to make the lid, repeat steps with smaller paper to make the base.

  1. Collect your stuff and settle down at a table- use a flat surface for folding paper…I use a plastic chopping board…

    Step 1-Gather your stuff
    Step 1-Gather your stuff
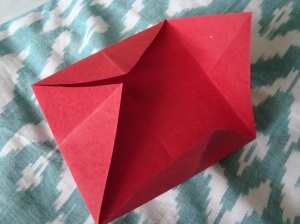
  2. Fold the four corners of the square paper to the center.Crease.Open.This is fold #1.

    Step 2 Fold corners to centre
    Step 2 Fold corners to centre
  3. Fold each corner to Fold #1 opposite it. Crease.Open. This is fold #2.

    Step 3 Fold corner to opposite fold#1
    Step 3 Fold corner to opposite fold#1
    The folds till now
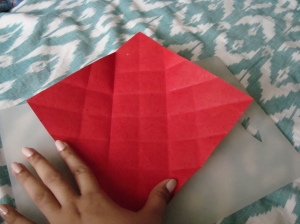
  • Fold corner to nearest fold#2. This is fold #3.
    Step 4 Fold corner to nearest fold#2
    Step 4 Fold corner to nearest fold#2
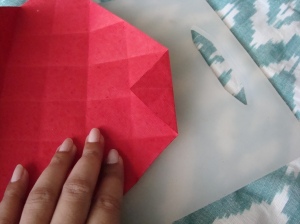
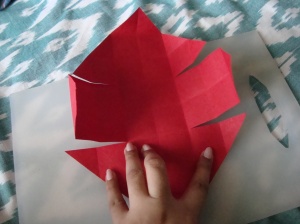
  • Cut four slits around two opposite corners( hope the pic explains it!)

    Step 5 Cut four slits- two on each side of Opposite Corners
    Step 5 Cut four slits- two on each side of Opposite Corners
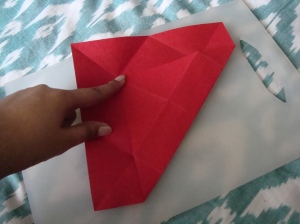
  • Fold inwards on Fold#1 crease line. Repeat for opposite side.

    Fold inwards on crease line
    Step 6 Fold inwards on crease line
  • Lift the folded sides till they are vertical along fold#2.

    Step 7 Make side vertical along fold 2
    Step 7 Make side vertical along fold 2
  • Join two opposite sides by holding them together as shown.

    Step 8 join the sides
    Step 8 join the sides
  • From one side, tuck the loose flap in.

    Step 9 Tuck the loose flap in
    Step 9 Tuck the loose flap in
  • On both sides, tuck the flap in and flatten it till the points meet in the center of the box.

    Step 10 Flatten the flap
    Step 10 Flatten the flap
  • Great!! Repeat this with a slightly larger square if you want to make a lid for the box (or a slightly smaller square to make a base for the box)

    Finished Box Base
    Finished Box Base
  • Your finished box should look something like this. Decorate it to your heart’s content- sequins/paint/thread/paper cutouts/ stones/ ribbon/block print on it- whatever you want!! This box is adaptable to any number of looks- you can make it formal as I have or make it casual by using magazine/newspaper pages.
    Completed Origami Paper Box
    Completed Origami Paper Box

    Hope this tutorial is useful!

  • How to Buy Beads

    I recently found myself regretting my eagerness in buying beads- the reason being two of the plastic striped beads I bought were not pierced. I feel so bad each time I think of it..Sigh…I wish someone had told me to notice all these things, maybe then I would’ve spotted the flaws. I think it’s about time we stopped to consider before we buy beads. Here’s a list of points to consider before purchasing beads.

    1. Check the length of the beads for uniformity. See that they are not too heavy or too big (long) for stringing onto any eye pin or headpin if you want to make earrings with them.
    2. Carry a headpin or eye pin with you and ask the seller if you can place the bead on it to check the balance of the bead.
    3. When buying headpins or eye pins try and check to see that they are not bent or tarnished.
    4. When buying ear wires check to see that the end “eye” loop is present( In the packet that I bought there were three ear wires that didn’t have loops)
    5. The beads should be pierced and have sufficiently large holes or loops for stringing.
    6. The beads must have an even color and should not have any flaky bits.
    7. Check metallic beads for tarnished portions (unless you’re going for the antique look.)
    8. Check if the beads have sharp edges or cracks in the bead or near the holes for stringing. The beads should have rounded or ‘puckered’  ends (soft – not sharp).
    9. Textured beads should not have cracks in narrow areas or irregular bumps.
    10. Dots on round beads and other texture elements should be solidly attached. If you can flick the dot off the bead with your nail then the bead is not too sturdy .
    11. Powdery bead residue should not fall out of a bead when you tap it.
    12. Take a friend along to help you decide what to buy especially if you are color blind like me
    13. Study semi precious stone beads and pearls before you buy and always go to a reputed dealer.  A good book on minerals and semi-precious stones is worth the money you spend for it if you plan to buy a lot of them

    Please feel free to add more points as comments.

    //

    //